We have been pinning bugs for 2 years now. IN the time I have developed a process for pinning. some shortcuts, and ways to improve the process for myself. I found a nice sized house centipede. I have done alot of reading this winter on insect collecting and entomology taxonomy, so since I have already decided to start live collecting, he was going to be our first specimen.
Photo Steps How to Pin a Bug - Freezer Method - Our Insect Collection and Family Hobby
I also wanted to capture the Steps to Pin an Insect in Photos. Here's a short series in pinning a House Centipede, he was found when we returned home from overnighting at my mom's house. He made a fast trip up my daughter bedroom curtains.I sill get a little creeped out when I first spot an insect, but my reaction quickly passes and I went into collecting mode.
- A plastic or glass collection jar - to put the bug in.
- something flat and firm to slide under the bug and trap in the jar.
- a kill jar (learn how to make one here or here) or access to a freezer (method which I used).
- styrofoam
- pins (depending on our level of collecting, you can use straight pins from home or purchase pins designed or pinning bugs that are museum grade)
- tweezers, optional
- clear nail polish or Elmer's all white school glue PVA. Learn more about glues here, and Elmer's glue for bugs here.
- box with secure air tight lid for storage and curing (we use Tupperware)
- bug storage box (we used Ferraro Roche chocolate boxes for our straight pins, but now we have shadow boxes for our bug pins).
- lead pencil and paper for labeling (we use all cotton rag paper, but standard white paper will due). Pencil or a printed label. However I find labeling as we go is easier for us.
LIFE IS STILL EXCITING AT OUR HOUSE!
With more insects. . .
AMI Studios Chicago
It's mostly baby girls videos and here slime making, she spends time with friends, goes on road trips, lots of coloring activities and make good choices while having fun. During the covid stay at home orders - she had many many many facetime pandemic playdates - we made time work for us and not be bored.
Photo Steps How to Pin a Bug - Freezer Method - Our Insect Collection and Family Hobby
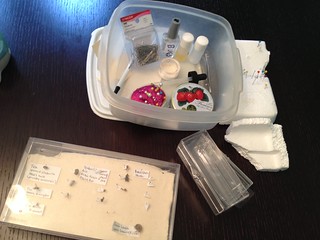
This is our original storage method for our bug supplies. I have evolved somewhat from this system. Here you can see my straight pins, where now we use true pins designed specifically for insects. However small viles of pine sol and water are always around for my hydration jar. The purple push pad was for staging pins. Clear nail polish for repairs. A small bowl and lid / container, for the hydration jar, pen for notes, a suction syringe and pieces of syrofoam. I still use a "starter" box for the final collection to determine later spacing needs.

Baby jars from my days of making homemade baby food. This is my bullet - which is waaayyyy better then a mini coffee grinder that I used to use, and leff chunky food like a blender leaves. As you can see here are 14 jars, - already had a freezer full of food and plenty left still in storage!
The Bug Pinning Process, Freezer Method
1. Collection:
I grabbed my collection jar to trap him, and slid a stiff paper inbetween him an the curtain for the capture. I knew immediately my preferrd prep method. If you use a kill jar or arent ready to pin. Keep your bug in an air tight container (to prevent infestation) until your ready to pin.
I chose to freeze him instead of the kill jar. He had amazing black and white spotted color on his legs, his body was black to brown. I had read a post about how freezing helps maintain the original color and the specimen won't fade as much. I'm sad to say his colors did fade and the spots darkened.
3. Thawing (not necessary when using a kill jar):
I removed him from the freezer after 24-hours. 4 hours freezing is generally sufficient for an insect this size. They fall asleep from the cold before death sets in. However I didn't want to risk him waking up.

1. Photo Steps to Pinning a Bug, Our Insect Collection, a photo by areyousureaboutthatblog on Flickr.
Here (above) he is already been moved from the jar to a clear box after he was allowed to thaw or an hour or so. Once thawed he moved to a piece of styrofoam, above are my size 002 pins and my pinning block (pins and pin block were purchased from bioquip for following correct pinning procedures).
I used tweezers to gently try to stretch his legs to see if he's thawed out. Specimens are delicate, don't force the legs to move or they'll break of and you'll have repairs to do. Sometimes patience is your best tool. I am assuming the moisture in the jar helps keep him pliable. And the fact that he was a fresh live specimen going into the freezer, so theres moisture trapped in his body thats thawing out.
4. The First Pin:
Pinning bugs is a process. I still have my gross out moments, even when the bug is dead. So I just keep telling myself, it's dead. And our collection will be nicer with him in it. Using tweezers (see below) I turned him abdomen down, using his leg to flip him.

1. Photo Steps to Pinning a Bug, Our Insect Collection, a photo by areyousureaboutthatblog on Flickr.
Using tweezers I turned him abdomen down, using his leg to flip him.

1. Photo Steps to Pinning a Bug, Our Insect Collection, a photo by areyousureaboutthatblog on Flickr.
Here he's moved to my bigger piece of styrofoam working area. Our Jamaica bugs are still curing in the background.
Inserting the pin is easy. Over time you'll learn mistakes are fixable!

1. Photo Steps to Pinning a Bug, Our Insect Collection, a photo by areyousureaboutthatblog on Flickr.
Here (above) he's bending at the pin head first enters the exoskeleton. I pinch the top of the pin with my finger tips so I dot push the pin in too deep.
I lifted him out of the styrofoam on the pin to check he's level.
Tip to Level Bugs on the Pin / Proper bug Position: Over time as you pin more bugs, you'll "feel" two punctures through the exoskeleton. The top first puncture and then a second push though the bottom of the exoskeleton. If you bug isn't level, over time, you'll see you can pull the pin our of the second puncture to reposition your pin, and push through again. Inserting the pin is easy. Over time you'll learn mistakes are fixable!

1. Photo Steps to Pinning a Bug, Our Insect Collection, a photo by areyousureaboutthatblog on Flickr.
5. Staging / Positioning the Legs:
TIP: You do not have to stage the legs. Entomologists do so they can get a clear look at the insects details, however home collectors don't have to do this. Especially depending on the volume of bugs your dealing with. You'll have time to stage maybe 10 bugs from collecting at the park, but an afternoon netting or black lighting with 100 bugs is rather time consuming, so pick your time commitment.
I'm a bit detail oriented. So I take my time positioning the legs, each and every one. I have become quick in learning techniques to help with stubborn legs that keep bending, raising the insects head, and staging antennae.

2. Photo Steps to Pinning a Bug, Our Insect Collection, a photo by areyousureaboutthatblog on Flickr.
Here (above) I moved the bug from the pinning block to the styrofoam. He's flexible, and long, his exoskeleton hasn't hardens yet, so his hind was limp on the pin. Just be cautious when moving long insects.
6. Staging:
You do not have to stage the bugs legs and head, thats obviously a personal choice.

2. Photo Steps to Pinning a Bug, Our Insect Collection, a photo by areyousureaboutthatblog on Flickr.
You'll notice 5 pins here (photo above). The second one from the top is the main pin. The first pin for staging was the very bottom one for the hind leg. However when I grabbed another leg his body kept wiggling, so I used my criss-Cross pin method to secure his body as stop his moving (he's dead, the body is just long and very pliable).
Tip: Criss-Cross Pin Method I use this method for Long bodied bugs that tend to move when I'm attempting to pin their legs, to position their heads, hold up the tail on wasps so they stay level, and when legs slide down the pins to keep them positioned. Here, simply insert the pin on a 45 degree angle under the bug (not in the exoskeleton) and follow the same procedure on the other side. This helps limit movement.
Then I staged the antennae to keep them from curling and out of the way.

2. Photo Steps to Pinning a Bug, Our Insect Collection, a photo by areyousureaboutthatblog on Flickr.
As you can see I used about 30 pins to stage this centipede. And I repositioned his antennae at the very end.Above our long legged friend is a wasp we uncovered early in spring, he wasn't ready to come out of hibernation, and were in the 30's and 40 degree temperatures in MARCH, note* were in a 6 month long winter!!! He wouldn't have survived and we brought him in for our collection. Younger son also found an ant. This is how we do it in these Photo Steps How to Pin a Bug - Freezer Method - Our Insect Collection and Family Hobby
Tip on Damaged or Broken Parts: I also lost one leg while pinning. Clear nail polish can be used to reattach the leg. Hold the leg with the tweezers, and position the leg on the tweezers how it will look when you reattach it. You don't want to be moving the parts your reattaching and fiddling with them once the glue or polish is on for attaching. Using the nail polish brush, brush of the liquid from the on the nail bottle (again you'll perfect how much to use over time). Brush onto the part (not the body or you'll get too much polish on the segment) and attached to the body. HOLD the part in place several seconds and gently blow on it to speed up drying process. I have also used pins in the cross-cross method to help keep the leg in place while drying.
7. Curing & Temporary Storage:
7. Curing & Temporary Storage:
My staged bugs go into a Tupperware container for curing. Tupperware is great because it's an airtight container, no other live insect can get in and lay their eggs (in the guts and exoskeletons of my collection as they disintegrate), thereby ruining my collection and the time I've invested.

2. Photo Steps to Pinning a Bug, Our Insect Collection, a photo by areyousureaboutthatblog on Flickr.
Our curing tupperware box (above) sits inside the larger bug materials storage bin.
I cure the bugs for 2 weeks or so. In the summer we are constantly adding to the box, so I'm frequently checking for readiness (see tip above). Bugs are ready and cured when you remove a pin and the legs, head, antennae will STAY in position.
8. Labeling:
We haven't labeled yet but I'll add it when we do. Once cured we will as the label to the pin and move the bug to it's permanent home. More to come....
9. Permanent Storage:
We used Ferraro Roche Clear Boxes when we were using straight pins. I havent measured them for the actual non-steel pins I use now. I do have shadow boxes I found at a thrift store for this years collection. And I am always searching for sturdy, air tight (or I can make airtight) containers. There are many ideas that are available. However, these are our personal preferences.
And this is a good way to highlight that Bug Collecting has guidelines, but you will find your own personal preferences for collecting certain species, pinning styles, staging, etc. Find your personal touch along the way to great learning and really a great fun hobby.
Other finds:
As I was photographing our bug, I noticed this dried exoskeletons of another house centipede stuck on a bag. This bag came from my moms house, which she brought over with Easter goodies. I don't know when he was attached, but he's in (definately) making it into our collection using the card points method. A pleasent surprise.

3. Photos pinning bugs, a photo by areyousureaboutthatblog on Flickr.
Here you can see the bag with the small attached exoskeleton nearby my bug bin.

2. Photo Steps to Pinning a Bug, Our Insect Collection, a photo by areyousureaboutthatblog on Flickr.
An upclose photo of a mini- house centipede exoskeleton. His location will go unidentified on the label, just that he was found on a bag carried from Chicago, to Indiana, and Back to Chicago.
Our Insect Collection is such a fun hobby. I hope these tips and photo guide helps you in the amature entomology taxonomy process.
Make Mistakes. Breathe, Reflect, and Laugh.Out.Loud.


No comments:
Post a Comment