Showing posts with label saving money. Show all posts

Monday, March 24, 2014

Mommy Made Hand Assembled Toddler Hospital Homecoming Gift

Our little cousins had surgery recently. As a home coming gift for him and his siblings we assembled a hospital homecoming gift.

Kids are stellar in play based learning. Kids understand the basics if what's happening to them and these ideas are solidified in play. This was a mommy made gift when I didn't find much in ideas online. I wanted something simple that the kids could play with based on their understanding of the experiences that were happening not only to the sick nearly one-year old, but for his brother and sister, who were also experiencing this illness crisis (because when our kids are sick it really is a crisis).


This little Hospital Homecoming kit makes a fun gift, but it's also a fun simple kids activity to assemble at home too.

Handmade Kids Birthday Gift and Hospital Homecoming by areyousureaboutthatblog
Handmade Kids Birthday Gift and Hospital Homecoming, a photo by areyousureaboutthatblog on Flickr.

Our Homecoming from the Hospital Kit:

- A new Elmo doll
- Elmo wrapped in a stretchy piece of bandage (from home)
- a bandaid on the bandage
- a box / container for our Doctor supplies: a small sponge square, an empty travel size shampoo container (which we use in the tub so we have plenty), a small notebook for writing down symptoms and a pen, get better stickers, pill bottle, bandaid box with 5 real bandages, and a small cup for water or syrup sipping.

Some parents feel children shouldn't open pill bottles, we advocate for teaching responsibility and never playing with real syrups and medicines. Also, parental supervision should be included so the blue bandage which is removable doesn't go around a toddlers neck.

Of course my kids made a handmade get well card too. We don't feel spending loads of cash is necessary to make fun, heartfelt gifts.

Make Mistakes. Breathe, Reflect. And Laugh.Out.Loud

Saturday, March 8, 2014

DIY Junior Bunk Bed Ladder, Under $8 for our Crib Conversion

Recently I converted our crib into a Junior bunk bed (here's how) for my younger son. He wanted a bunk bed for his birthday. As I browsed ideas online, I was troubled with the thought of spending money for two new beds (older son was going to get one too). Why spend $100 for a new metal bunk bed when we had a perfectly good solution at home. Now I just needed a ladder. He had been climbing in strenuously for a few weeks. Partially because bunk bed ladders and 3 or 4 step ladder cost $50 on amazon. I didn't save all this cash to spend it on a ladder! I did find a $20 rope ladder for indoor outdoor use, however I soon realized we had a resource right at home.

The boys have this wood building set, similar to Lincoln logs, however larger stronger solid pieces. When I was taking one of the sticks away from the boys, telling them these are NOT swords, quidditch brooms, (or insert you weapon of choice here) you realized how strong and solid these pieces were.

The rope ladder that I had ordered was made of slim pieces of wood for the steps. These pieces I had at home would definitely suffice. I knew I could attached them to the thick slats of the bed if I pre-drilled holes for the nuts and bolts (pre-drill so the wood doesn't crack). However I didn't want to drill holes in the "steps" because they wouldn't be as sound or stable to support my sons, and daughters, weight. So I decided to attached them using a bracket. We had to be creative, and the guy at the hardware store was helpful. He suggested copper pipe fittings to brace down the slats. they worked great.

DIY Junior Bunk Bed $6 Ladder for our Crib Conversion by areyousureaboutthatblog
DIY Junior Bunk Bed $6 Ladder for our Crib Conversion, a photo by areyousureaboutthatblog on Flickr.
So once I was inspired there was no stopping me....onto making our crib I mean Junior Bunk Bed Ladder.

What I needed:

- 2 wood slats for the ladder (from our Lincoln log-like set at home)
- electric drill for screws and to pre drill holes.
- electric hand saw to cut away unnecessary bed slats so my son could walk up the ladder comfortably.
- nuts and bolts to attach brace to slats ($1.50 for 6)
- brace / pipe fitting to attach the steps. I took a piece of my wood step with me to make sure the brace would fit around the wood and be able to sit flush against the slats where it would be bolted. ($3.50 for 5) Ironically when looking for the flat square like brace which I had in mind, it didn't exist at the big box hardware store. I asked an employee in his orange apron for help and he advised these copper or steel pipe fittings that plumbers use.

Total $3.50 for the brackets and $3.00 for the nuts and bolts. $7.50

The rope ladder is being returned. I am sure it's great. But I like my low cost homemade option instead.

Steps to installing my Easy Crib Ladder:

Guesstimating Spacing
I held up the wood pieces and eye balled there fit. I was playing moving them up and down guesstimating there spacing. Looking for problems. First, I wanted to be sure they would be long enough from the left side leg to a slat near the middle. Second, I also eye-balled spacing of the pieces as steps.

Cutting
I marked my wood pieces. Cut them with the saw (on the saw stand). After I sawed down the wood pieces I marked again where I'd like the pipe fittings, this time measuring for space between steps.

More Guesstimating
I didn't want my young son stepping to high or too short between steps - I wanted him to have a natural feel climbing up and down this ladder. My steps worked our to be about 9 1/2 inches apart. Allowing for the natural crib top rail (now on the bottom) to serve as the first short step off the ground.

You will also notice when I installed the most top rung, its slightly under 9 1/2 inches because I didn't want him to bump into the top of the crib mattress peeking through under the most top rail - see the light green sheet and the gap just above it.

After the Install, Troubleshooting
Even tho the pipefittings seemed to fit snug when I tested them with the wood pieces set against the Bunk Bed Rail and just before final bolt and nut installation, once I screwed and tightened everything there was still a "little wiggle" to the steps. I didn't want ANY MOVEMENT incase my sons cute little tow or skin of his foot was near the bracing he could get pinched. I realized I needed something like a little "shim," to help secure a snug fit. Similar to how construction installation works on a new door, or any wood working.

I hit the toolbox back in the basement and found little electric tube caps used in wiring. These would be too big, however that sparked the idea to use the plastic anchors (sold in picture hanging sets) to slip into the brace. I ended up pushing them in - one on each side of the brace - with my fingers first and (when the fit was still loose) hammering them in further. They went in nearly all the way with the hammer. And everything was snug. No pinched toes or feet :-)

I am happy to report that since this post my darling baby girl climbs up the bunk bed to join her brother for a book in the morning. I hear them often in my light sleep. Gosh I love those kids letting mommy rest a few more minutes....


Make Mistakes. Breath, Reflect. and Laugh.Out.Loud

Saturday, February 1, 2014

Traveling with Kids, Beyond Packing Backpacks. Getting Kids mentally ready for long trips is just as important. "How to Talk to Kids" About your Upcoming Vacation.

In preparing for our family vacation to attend a dear friends wedding in Jamaica, I wanted to prep our kids for what to expect.  Pinterest has oodles of pins on what to pack in your kids carry-on. But what about the emotional and mental preparation?  As an avid traveler for my WHOLE LIFE, both by road and airplane, I knew there was as much mental preparation as physical packing that's required. I wanted some discussion ideas for setting our kids travel expectations. I wanted some games and activities to help our kids prepare for the Long Distance travel. This was a new experience for my kids, and we know that talking about it helps tremendously set their expectations and too keep my sanity.

I couldn't find many resources, so here's our Beyond Backpacks, packing our emotional toolbox for vacation.

2 Adults 3 Kids = 1 checked medium luggage, 1 checked carry on luggage, 3 backpacks, 1 roller carry on, 1 purse
I was reviewing Pinterest for some quick links to mom bloggers and magazine articles on what to prepare  when traveling with kids. Our actual luggage and carry on items lists are below, eventhough this isn't what I was looking for.

We are taking our three kids with us on a fabulous Caribbean island getaway for a lifelong friends wedding. We have taken the kids dozens of times to nearby states, within a 3-4 hour drive to Wisconsin and Indiana. And once I traveled alone with my best friend on a 12-hour train ride to Minnesota with our then four kids: 4 year and 18 month old boys and girls!! However, we had yet to take them anywhere by airplane. I'm a traveler since childhood with extensive experience and stories. I've been to 45 of the 50 United States and 8 countries. My husband and I visited 4 countries and 8 states prior to having kids -- (for prosperity ...details). 

I know how to live out of a carry-on for 15 days as we did in Japan. And countless weekend getaways taught me less is much much more. Packing our clothes was not my concern (however I do include our Island Caribbean packing list below).   I was more interested in the anticipation and "mental" preparation for the kids. Of course I did come across the fab tips and tricks savvy Mom's had that I loved:

- pack gum for the flight for popping ears
- pack an entire bag of lollipops - for there and back trips for toddlers popping ears (and when you just need silence, like the wedding ceremony!)

However I didn't find anything beyond packing the kids backpack carry-on. So here's my version of preparing kids for long travel.
I still packed too much!!

Traveling with Kids, Beyond Packing Backpacks. Getting Kids "mentally" ready for long trips is just as important. "How to Talk to kids" about your upcoming vacation. by areyousureaboutthatblog
Traveling with Kids, Beyond Packing Backpacks. Getting Kids "mentally" ready for long trips is just as important. "How to Talk to kids" about your upcoming vacation., a photo by areyousureaboutthatblog on Flickr.

Upon entering the airplane, my two year old baby girl was invited into the cockpit. She did NOT have to be encouraged. To my amazement she went straight to the steering wheel and wanted to push All Of The Buttons. Then the captain came and we had to scoot. And smile at the long line waiting for us to get into the cabin (oops).

Traveling with Kids, Beyond Packing Backpacks. Getting Kids "mentally" ready for long trips is just as important. "How to Talk to kids" about your upcoming vacation. by areyousureaboutthatblog
Traveling with Kids, Beyond Packing Backpacks. Getting Kids "mentally" ready for long trips is just as important. "How to Talk to kids" about your upcoming vacation., a photo by areyousureaboutthatblog on Flickr.


Timing:
By Christmas the kids knew our trip to Jamaica was in January. Yes, we told them a whole 2 months early! We ended up "reviewed the timeline" very often. Remember we are building our kids emotional tool box, setting expectations, so don't be annoyed when your kids ask ten times about an upcoming event. Put a framework around their questions to help keep their excitement calm and your parenting sanity.

My youngest would ask "Mom when is my birthday?" And I'd reply (with large concepts he could understand) "first is our Winter break starts, then Christmas, then New Years, and then  we go back to school for 14 days. After that we are in Jamaica where we will celebrate your birthday." He'd say: "Yes!!"  I know it's a lengthy reply, but it was an extensive amount of time to let pass. He would get antcy if we didn't put a framework around his expectations. By New Years Eve he was checking off the list for me, "Mommy, New Years is over, next is School and then we will go to Jamaica for my birthday celebration!" Isn't that better then a kid crying about when is he having his birthday?

Next - Dealing with the Intangible: Time

1. A Countdown paper chain. Similarly to when we traveled to Japan, upon returning to school we made an easy - and not fancy - countdown chain or Jamaica. As the time draws near kids need help managing there anticipation.  Counting days, everyday helps a lot.

2. Tell Me Why / When?  Just like kids love hearing their favorite story over and over, or their favorite song EVERYTIME your in the car, they also want to hear about the trip your taking. It will be the same questions like: where are we going? When are we going? Why is it hot there? After you answer the questions enough times you can flip the script on them. When the kids ask you a question you can simply ask the question back and say "Tell me why?" Or "Tell me when we are leaving?" Once you have answered the question, you helping kids apply what they heard you say, helping memory skills, and eventually layering ideas which helps with complex thoughts and future problem solving skills. 

3. Preparing Kids & Anticipating the Trip - as the vacation became weeks away we would start to ask the kids questions:
- what will Jamaica look like?
- what will we do there?
- what will we eat?
- do you think the people are nice? What do they look like? 
- what will our room look like (sleeping arrangements: my older son doesn't like bunking with his brother, so we had to break the news that they were sharif a sleeper. As an aside, to help with this bunking together, we recently agreed to let older son have his own room, so if younger son is regularly sleeping in a room with his sister - bunking on trips will be less of an issue.)

Obviously our few questions lead to more questions from the kids, and great family discussions. An obviously that's the point, conversation. It's healthy to discuss what's coming up next: (and not just for those future problem solving skills) children's coping skills for all the big changes, kids can anticipate patience, and being bored on a 3-hour flight. 

These conversations were great times to talk about: appropriate behaviors, and when not to talk, like through customs. Kids don't yet grasp finite details like the difference between foods you need to declare and say gum, or hard candy. I didn't want my son correcting me when I say no food (I could already see him politely chiming in - because normally I allow it - "don't forget the candy and bread mom." I'd reply, "no honey we already are it on the plane," and said customs official directs us to the table for a search.... More time wasted). So to completely avoid this we told our older and younger sons "there will be times that only mom or dad talks to the adults at the airport!!" This simplifies matters quickly.

5. Packing Matters
Some surprises are nice too - so don't tell them everything you are packing. Or maybe pack an extra new toy (ours was a Lego chima pack for $4).

-- The kids each had a snack bag, but didn't know about other snacks I packed.

-- Some things we left out. Like talking about a possible in flight movie (in case it was something the kids wouldn't like). 

-- I did pack a surprise small Lego chima pack to assemble for the flight cause when they got super bored I had a surprise planned.

This PACKING LISTS fits IN:
- 2 medium size luggage (I actually took one medium and one carry on checked, however it's good to leave "room to grow" so your not carrying souvenirs in a plastic bag that you have to carry).

Total carry-ons 4: Dad, Mom & Baby shared, Older son and Younger son.
Plus moms purse.


Our kids carry on packing list:

I've always packed my luggage as if "I'll never see it again or it'll be delayed getting to me." So we always pack a bathing suit and a change of clothes in our carry-on. In this case my husband took he kids changes of clothes because he personally had NO carry on needs.

Each kid picks their carry on back pack. I overrode younger son and AFTER his back pack was packed, and heavy, I insisted he take the roller pack (backpack on wheels). I had my own stuff to schlep and I wasn't gonna take his cause mom it's too heavy. When younger so protested I made him wear it around the house all morning... At the end of the first hour he agreed - "it's too heavy mom!!"

6. Each child was asked to pack one (their choice):

- snack bag (we picked up non-sticky food packs at target. Yes, I bought mini snack-size packs instead of making my own... Sanity!)
- small soft stuffed animal / toy
- small pillow (they can lean on this in the plane / back support / snuggles, etc.
- small favorite book
- a small journal (we encouraged drawings pictures or writing about the trip everyday. Especially when the kids were antsy waiting for lunch on "island time" we'd take a toy Or journal with us for stuff to do)
- small (not tiny, always leave room for more stuff or consolidating later) sandwich zip lock baggie for crayons, a pencil, and sharpener if needed
- gallon Baggie 1/4 full if small hard toys (my Lil' ones like playing with army guys, animal figurines and matchbox cars)

Then child specific:
- younger son get a sandwich bag 1/4 full of his beloved Legos. Which HE picked the pieces.
- younger son favorite dot to dot coloring book
- younger son Pokemon cards
- brain quest age: 4-5 

- older son took a second book (Diary of a Whimpy Kid for him to re-read, again)
- older son dinner game questions and his animal cards - we play "bigger stronger" all the time since age 3, and evolved to better predator by age 5

- baby girl gets those over 600 sticker books. We put a sticker on her hand and she sticks it - mostly crooked - to the page... Hours of fun! Her and Younger son
- change if clothes
- diaper needs in baggies - so I don't carry things loosely in my hand on the plane - I'll need to grab her or a seat in turbulence and I don't want my diaper, wipes, and butt paste to I flying
- extra lollipops
- scooby doo memory game, we just look trough the cards in the bag and match them

I also took for me a book, my jewelry, make up bag and my one outfit and bathing suit. I also fit a change of sandals. My carry on is slightly larger then a backpack so I took 3 more pieces of my nice clothes. 


7. For 3 Kids: our Island Caribbean luggage packing list:

Kids helped pick their outfits- try need to learn how to mix and match clothes and patterns. These packing times are ideal to learn these valuable skills!!

We planned to live on the beach. And we decided to get "dressed fancy" for dinner each day (the kids LOVED this idea). We packed accordingly.

- 3 bathing suits each (1-packed in carry on)
- we lived in our bathing suits so only 4 pair if underwear. We can always wash them in the sink if needed.
- 3 pairs if shorts (nice, no holes or rips) (1-packed in carry on)
- 3 best tshirts + 2 extra (we use them as pj's, beach cover ups I'm strong sun, and a quick change before lunch from one Tshirt to the next). (1-packed in carry on and one used for layering on our airplane outfits).
- 1 pair of crocs (worn to airport with socks)
- beach non slip shoes (we are a barefoot no socks family in the heat!)
- Accessories - 1 belt each and suspenders (boys can share for variety)
- 1 "fancy" wedding shirt (we choose a linen button down for younger son and a yellow collared polo for older son. 

Baby girl had 1 pair of shorts and 2 dresses replace the other 2 pairs instead. 

For kids I also packed liquid Motrin and pepto Bismal for a just in case emergency (I don't like relying / waiting on hotels and others when I neeWe had a d stuff / first aid for my kids - so I did over prepare here). We also had a few band aids, my personal tweezers, a small neosporin tube for cuts, small hydrocortisone tube for itches or big bites and An ear thermometer.

Each child wore long pants for departure, then layered in a Tshirt, lightweight long sleeve (great for possible sunburn cover up too) and a polo shirt for boys on the very top. Baby girl had a floral shirt instead of a polo. Then each child had a hoodie sweatshirt. Before landing I changed each child into shorts and simply removed there layers (during flight for comfort) and ultimately down to their tshirts for landing. There was room in each of their carry-ons for their clothes or in dad's carry-on.

I am blogging this for many reasons. I of course will return to this post for my electronic checklist. WE HAD A SUCCESSFUL TRIP... so I am going to use this advice for myself again.

Make Mistakes. Breathe, Reflect. And don't forget to Laugh.Out.Loud.

Crib Converts to a Junior Loft Bunk Bed for Younger Son

Younger Son wanted a bunk bed for his birthday. And then Older son wanted one too. We started talking more and more about his birthday and we decided we would celebrate on our trip to Jamaica (which you can read about our Packing Guide for Travel with Kids on that trip here).  We tabled the bed discussion so I could start my mommy homework. A low cost bunk bed option. I never want to spend a lot of money. And, soon, I'll start posting all the furniture - PERFECTLY GOOD FURNITURE - that people put in there alleys around Chicagoland. I have a few pieces in my home, sshhh, don't tell husband.

I first looked online at retail ideas. So I could see what's trendy, price ranges, and get inspired. After reviewing simple loft beds, I felt guilty spending even one penny let alone $200 when we have great perfectly good beds at home. My older son has a beautiful hand me down wood frame, younger son has his fire engine bed, found in said alley, and baby girl has her crib (a family hand me down from when my Older son was born).

IMG_4016
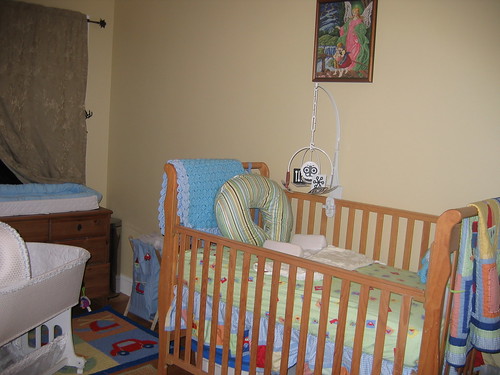
This is the original crib assembled as a crib. The photo is from when my young son was a baby and the mattress support was attached high on the support beams. 

I didn't include traditional wood option bunk beds because those were waaayyyyy out of my budget. I did save birthday money for some time and had about $500. . . however, we have perfectly good beds at home. Also the wood options are bulky chunky and take up way too much room. I also wanted to take advantage of the high 9 foot ceilings we have in the bedrooms.

Then I hit Pinterest for more ideas. And then Amazon, and then Ikea. I did find some nice simple steel framed Bunk and Junior Bunk Beds for $100 each. Again, the rather specific mom that I am, some would say very Type A, I would want new mattresses (latex of course) and now we are paying $500 PER mattress on sale at my wholesale find price.

UGH! I realized this is not the right decision to buy BRAND NEW BEDS when we had perfectly good furniture at home. What a HYPOCRITE I am trying to be cost conscious, environmentally aware, recycling, blah, blah, blah and here I am shopping.

I did find a few ideas on Pinterest, dresser conversion to changing tables, parents who built frames for bunk beds they wanted. Even craigslist had some great gently used versions. But - still NO - spending too much.

Then it was bedtime one night, mundane usually. I was changing baby girls diaper and my older son was hiding in the "dungeon" under her crib. I was already starting the consider the time I'll need to convert her crib into a toddler bed. This was a selling option of the crib a few years ago. And it hit me - as I thought through the toddler bed conversion instructions - to "reverse engineer / assemble the crib."

Crib Converts to a Junior Loft Bunk Bed for Younger Son by areyousureaboutthatblog
Crib Converts to a Junior Loft Bunk Bed for Younger Son, a photo by areyousureaboutthatblog on Flickr.

How I Set Up My Junior Bunk Loft Bed from a Crib:
(basically I assembled the crib upside down)

- I could simply flip the crib upside down,  
- reverse the bed base upside down
- install the crib rail upside down

This would basically reverse assemble the crib upside down, elevated off the ground to a "Junior Bunk Bed Size."

Looks like a young boy sleeping in his crib. It's actually our Younger 5 year old son sleeping in his new (to him) converted crib to bunk bed. Super sturdy and safe!

So Now all we need is a ladder. See this post on how I made our Junior Bunk Loft Bed ladder for under $8.

NEW UPDATE :: YOUTUBE CHANNEL INFO ARE YOU SURE ABOUT THAT BLOG


Our family has had many adventures through the years. Mom, the @Minstr0Interior had an a-ha moment . . .  Suddenly I See what we will have filled our life with, ADVENTURES! We travel, craft, sing, dance, collect insects and spend loads of time together. Sometimes too much time together. Our kids have recently begun to document their own adventures, and so this channel was born. Enjoy our adventures. Or not. WANT MORE? If there is a blog post accompanying this video we will share it here. Sometimes we will include the ingredients list of the craft or recipe, or the itinerary of our trip. In the meantime click play. 


From our family: 👍 + 🙃 + ❤️ ( Thumbs up, emoji face, hearts! )


See It Live >>> 


https://www.youtube.com/channel/UC2mGpujQIVgxdfTImFnQuLA


Originally Published on February 1, 2014

Make Mistakes. Breathe, Reflect. and Laugh.Out.Loud

Wednesday, September 11, 2013

Our Thrift Store - New to Me - Mommy Shopping Rules for Children

Can I just say I love 2nd hand shopping! Saving money is a thrill... Especially when you get things on the "I need" list. But when you really want something and can save cash too, well move over cause I want some I that savings.


Wednesday, August 21, 2013

Back to School Ways to Save

Summer felt so short this year. Probably between preparing for our trip to Japan and packing the kids for their two weeks with my mom, that prep ate up a lot of time. So, with school starting we are getting back into our routine, and that includes Saving Money while getting our Back To School supplies!!

I love saving money. I get a real thrill knowing that I saved money by Not Spending Money. And for those absolute supply needs its great saving 70%, 80%, and 90% off retail prices. Saving money is an irony for me, because ideally we Do Not  want to spend any money. Don't crack open the wallet if you don't have to. 

The Back to School shopping frenzy sometimes makes us parents feel like we are doing something for our kids, helping their back to school success, and making them happy with new "things." But really do those freshly opened packages of pencils, crayons and markers make them any smarter? On top of the shopping frenzy, there's a small emotional learning for my kids too: you don't have to "shop" for "new things" to be successful in school! Don't get me wrong - sometimes we do need new tools for our job: pencils, or a pencil case, but these items don't improve your reading skills! Or make our kids happier on that first day of school. What's the message when that new pencil breaks? Or their new clothes gets a rip? Is that item, that's now ruined, making them sad?  I should hope not. 

But when it comes to a new school year, there's always a list of supplies that are needed (notice I didn't say need to be purchased).

Here's a few ways we save on School Supplies:

Recycle Last Years Supplies

At the end of the school year my son brings home his pile of papers, projects, half filled notebooks, folders, and used pencils. From 2nd to 3rd grade transition we reused several pencils, folders, notebooks and our book bag. Hos notebooks had maybe 15 pages filled. We ripped those out for reuse. Pencils were resharpened if they were more then half their original size. Otherwise they stay home in our homework basket for at home work. 

Repurpose Packaging

There is the unspoken pressure, as kids get older, to bring in "new supplies" to school. We get around this in 2 ways. 

1 - Keep a Like New Box.Iin my storage area, I keep a few boxes for crayon, colored pencils and markers on hand. So when I'm thrifting, or consolidating a few crayons from a larger box (say 60 crayons), I can put them in a smaller crayon box (24 count). My sons taking a "new" box of crayons to school and moms saving money.

2 - Put it in the Pencil Pouch. We opened our thrifted colored pencils, barely used, and put them in the pencil pouch and tossed the tattered box with another kids name on them. 


Store School Supplies in One Place

You don't need to hord supplies, because excess is wasteful too. But do keep every thing in one place so what you have is easy to find and replenish. 

For us the toy room is an ideal place to securely fasten shelves for kids stuff that isn't often used, but easily accessible. We have our box of large items like notebooks, boxed items like crayons and color pencils, glue sticks and folders. 

Then our pens pencils (see the link to alternative bags) and used crayons go into the supply box, or our kitchen craft shelf for project time.

When craft supplies run low I can easily access our supply boxes. Our "recycle & repurpose" supplies are here to. So creativity is sparked within eyesight of what we may need.

I also keep our incomplete craft sets, unused items, excess usable crayons & markers from previous years here too. Great for future school supply lists and our crafting supplies.

Thrifting and Discount Stores

All discounts are not equal!!! We do thrift, with a tighter belt then in previous years. It's easy to fall into excess, even when your saving money. When school supplies DO go on sale (July / August) Target and Walmart sell crayons for $0.25 a box. So when I'm thrifting, crayons need to beat that price. It pays to be familiar with reduced retail prices so you can know when the thrift stores truly have a deal.

Our rules for thrift stores always apply. 1. It has to work/it is not broken. Even opened packaging is acceptable. Especially with school supplies. Just be logical an think thru if you can: 
1. Find the purchase elsewhere for a better price? 
2. Unique items always come home! 
3. Do you REALLY need it?

Big Box and Discount Stores

The same thrifting theory applies to Big Box & Discount stores. Big Lots recently had heavy stock folders, 15 in a pack for $1.50. That's $0.10 per folder - great deal. But during back to school sales Staples has $0.01 penny folders. That's a Better Deal! I personally won't drive out of my way to another store for a few cents savings, because I'll spend what I would save on folders to drive there in gasoline! If it is not "on the way" I'm not going. So take into consideration the convenience of savings. 

As an aside, read the fine print if you do go in for $0.01 folders or something similar, there's a $5 minimum purchase requirement. So you have to spend to save. Back to Schools a great time because you can stock up on other sale items. But be careful of the impulse buy. You might spend everything you've saved for an item you wouldn't otherwise buy.

My favorite false frugal save is dollar stores. Don't buy crayons for $1 when target sells them for $0.25. And sometimes there brand of markers doesn't last as long as crayons does. So it's not worth buying generic if your running out and buying replacements - due to failure!!

Buy TWO

As the school year passes, by Winter Break its time to restock up on use supplies. New pencils, erasers, maybe a few notebooks and glue stocks need to be replaced. And yes, teachers will ask for Kleenex boxes am paper towels again. So when we make our back to school purchases we usually Buy Two of what we don't have in our supply box at home.

Make mistakes, breath, reflect and Laugh.Out.Loud

The days are long but the years are short, very short. As was our summer!!

Thursday, August 8, 2013

Bank of America tried to Charge Me an Application Fee when The Application Process MADE my Rate Lock Expire!! Instead, I Got Paid!!

I applied for a mortgage loan refinance with Bank of America. After a grueling 6 months we finally closed our loan, with our promised rate, even tho the "rate lock" had expired.

Our first rate lock expiration was January 19. I was working with a very nice processor to get my loan processed. She's the go between me, the consumer, and "they" the underwriters who actually look at all of the paperwork and process my loan. We were applying in a new "less paper" mortgage refinance option called "Fast Track" since we were long time customers in good standing with good a good credit rating. The loan application took 2 hours! But almost no paperwork was required from us in the process (priceless!).

Long story short, I'd get those annoying emails on how "my loan needs I close before my rate expires"... However all this paperwork jazz is really outta my control once I send them what they have asked for.

So my application was taken in October over the phone by a rep. in Arizona. I've been in touch via email weekly with the bank. There system tracks these communications. When in December, my closing wasn't happening I wrote an "email of concern" to the girl who took my application. She said we "might close my loan even faster. I'm on the fast track to approval." Then I wrote again in January.

"We have only 7 days until the rate lock period ends. Please advise. It doesn't look like I'm going to close my loan in time" She wrote back: "if needed we can extend our rate lock."

I wrote back: "We are long time HAPPY Bank of America customers. Since we locked my rate in October (now January) rates have fallen. Since its the underwriting side taking extensive time processing my loan, I'd like to request a revised more current rate."

Of course I know they won't/can't do this. And they shouldn't charge me any fee (generally 1 point (that's 1% of your financing amount), in my case $1,500) to extend the rate either!! She said they'd extend the rate "as a courtesy." So I write back an extensive email asking for at least a "credit" of any sort to my loan for the undue burden, email highlights include:

"I've consistently received emails saying the processor is "checking on third party stuff." I have submitted all my required documentation for the loan expediently. We are long time HAPPY Bank of America customers, not typical in banking these days. Any service issues in the past have always been resolved and we stay because of this kind of good customer service. The issues and delays are not your fault or mine, they are a failure of the system!

Our loans been in process 75+ days. The rate lock is "not a promise to close," but it is a commitment of delivery of my loan to your investors.

Your loan documentation rate disclosure says on page 7 "we will do everything we can to provide our customers with excellent customer service, and address and concerns regarding your loan."

I am asking for a financial incentive to finish the loan. I realize you can't give me a new rate, but you can certainly offer me a credit towards the loan. Every bank has a policy to cover issues around Rate
Locks. Please see what you, or your supervisors can do."

They offered me my existing rate plus 1.5 point credit to my loan (that's 350$). 

But don't get too excited. The paperwork processor was charging me incorrectly on the revised extended rate lock ($1,000) and no sign of the credit. It was on the revised document called the "Good Faith Estate." My credit should've put me 900$ ahead. Getting this issue fixed went on until the night before closing, when my Good Faith Estimate still showed a new $1,000 charge for my rate and no credit as was promised. So what do you - an average consumer do? Start dialing UP.

Every email and voicemail had at the bottom the name of the immediate supervisor for the representative I was working with and their phone number of email address. Use it!! So I called up, and every supervisor had a supervisor, I called them too. I left voicemails up the chain 6 people until the last guy had no email or phone number to give me. He was apparently a "Big Boss."

Briefly my voice message was this, but if I emailed the below text to the supervisors, it was followed by the email trail as mentioned I this blog of my discount toward my loan because of the "system failure."

"I am desperately calling because I am in the loan pipeline for nearly 4 months, and it's the Friday night before my Saturday closing which I need to reschedule again, because 1. my application is being INCORRECTLY charged a point for a rate extension which you the bank initiated. And 2. my $1,500 credit has still not been applied. Please help me resolve this issue. I am calling supervisors because I don't know what to do anymore, can you help me get my APPROVED loan closed?!?!"

Well, at 7:30 am Saturday I got a call from a very nice supervisor who was All.Over.My.Loan!! He repaired the rate charge, applied my credit (and then some). 

Steps to negotiating with the bank:

1. Persistent and polite. 
2. Playing a little stupid helped too.
3. Don't give up
4. Use information about "customer service" to help your cause too, it's probably written in the loan documents disclosures. Those are worth reading! They saved us $3,000 in closing costs.
5. Don't threaten to leave or walk away, because no one wins then.
6. Finally, go up the chain of command. It takes time, you'll tell your story 100x's, and maybe to 3 supervisors up, but take whatever help your offered! 

Make mistakes, breath, and don't forget to laugh.out.loud. 


Related Posts Plugin for WordPress, Blogger...

Search This Blog

PIN it