Showing posts with label PINspiration. Show all posts

Monday, February 29, 2016

Plaid Skirt Becomes a stylish Structured Scarf with a Tuck and Fold Stich

When I was about 12 years old my father went on a trip to England and Scotland visiting extended family. When he returned he brought me a traditional skirt from Scotland. On my young body I wore it with sweaters and turtlenecks in the cold Chicago Winter. 

As the years passed somehow I had kept the skirt. So many of my own treasures from many travels were lost in moves (or I wasn't encouraged to keep them). So this skirt "surviving" was a fun find for me. All these years I didn't know what to do with it. One day I was going thru my keepsake bin and came across the skirt. As I monitor fashion ideas on Pinterest, clearly  "tartan blanket scarves" are all the rage this season. And so came my "PINSpiration for a scarf." 

I came across some sewing techniques on pinterest as well. There are several pins on 4-point sewing techniques to make shapes and add structure to materials. Then I saw blouses with a tuck and fold stich. I realized the existing fold over on the traditional plaid skirt will convert nicely using this stitch method.
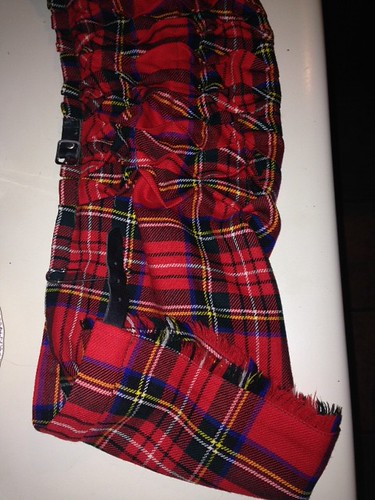

Plaid skirt converts to scarf Pinspiration
Tuck and fold stitchs (top) and the skirt front flap is left flat (bottom of picture). This
is intentional since when I played with the various folds, I get alot of variety for wearing
the scarf with some of the skirt left not stiched /detailed.

Early in the fall - post the suessical the musical sewing - I kept my sewing machine out and accessible. I put the skirt on and just started playing with it, folding it different ways.

I had to decide:

  •  where to move the two buckles
  • to keep the large skirt flap folded or flat (I made a hole so the belt hook can hold it up)
  • I had to decide the distance between the tuck and fold stiches


This project ultimately took 3 -4 days. Not 8 hour days spent sewing. 3-4 days because of those previous in between interruptions from the kids needing a snack, help with a toy, a reminder to behave and play together, etc. etc. etc.

I am very very pleased with the results. It is so use-able to "dress up" or "down" and outfit. It's unique and stylish. I love LOVE love the structure on the scarf - it holds shape amazingly. Converts outfits easily into something stylish with jeans, basic black or blues. 

Untitled
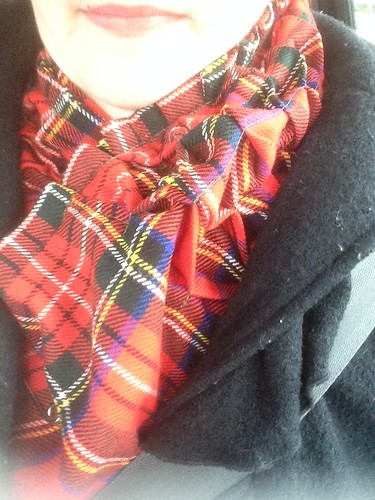
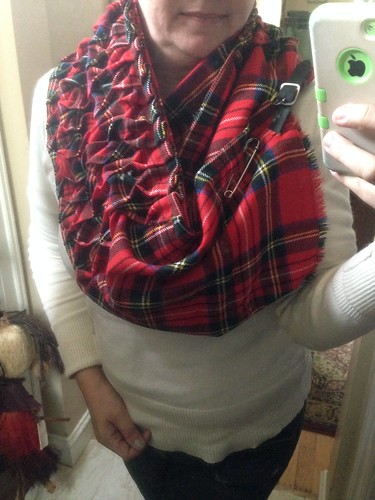
Plaid skirk scarf conversion, worn loose showing the buckle details.
Tuck and Fold Stitch approx 3/4 inch spacing.


Untitled
Plaid skirt becomes a scarf conversion, worn snug for warmth to
shield the windy Chicago weather.

My favorite part of this project was my baby girl. She wanted a matching scarf! "Mommy , I LUV your new scarf, can you make me one?"  Me - (Gulp? From Scratch? I just got done making over 100 costumes! ) "Of course honey!"

I remembered seeing some plaid skirts in her storage bin of "older" girl clothes I had in the attic. Digging I went. And sure enough she had a red paid scarf.... perfection.
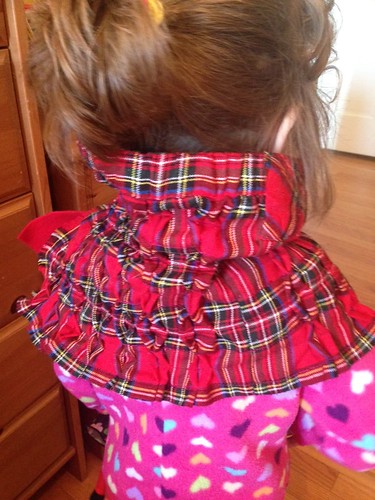
Tartan skirt becomes a scarf using tuck and fold stich
The back of baby girls scarf. Has lots of structure, to keep its shape.
The benefit of the skirt waist reinforcement and the tuck and fold stitch
throughout the balance of the material.
Her scarf, when we sized it up, didn't have enough material to wrap all the way around her head. I used left over scarps of felt from Dad's cat in the hat costume (yes, made that too, Suessical is in my blood I guess) as a "tie" on her skirt to scarf conversion.... 


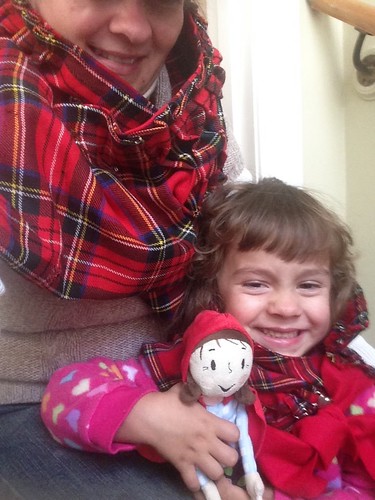
Tartan skirt becomes a scarf using tuck and fold stich
Mommy and Baby Girls matching scarf. I can't imagine us
wearing "matching" clothes when she is older, so I am soaking
up her love of mommy's style now. . . while it lasts.
 

The skirt had a nice trinket detail on the front, we use that as a fold over point to secure the tie. She looks adorable. And her tuck and fold stitch went smoother than mine.... practice makes perfect better.


Make Mistakes, breathe, - make her the matching scarf - reflect and Laugh.Out.Loud.

Thursday, October 1, 2015

Kids Don't Care if their Project Does Not Look Like Pinterests Pictures

Pinspiration has been the tragedy for some, and something fantastic for us. Fantastic with mistakes. But I have always taken the time to show my kids that even when our project doesnt look like the Pinterest picture, we still learned something and still had fun making it.....In addition. The kids DO NOT CARE that it doesnt look like Pinterest. How About That!

They care about their day to day interactions. Their attempts at science, the project, or whatever weird craft alley I was dragging them down. Here my Older Son, then 4 or so, was exploring with paint on the floor. I remember how he loved the "new venue" to craft. So simple.

IMG_5036

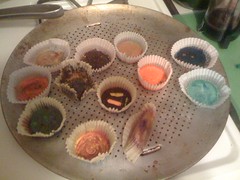
Homemade Crayons
Pinspiration melted broken crayons repurposed into new cookie crayons. Fun.

IMG_5045

Make mistakes, breathe, reflect and Laugh.Out.Loud

Fathers Day Gift, Easy Handmade Kids Craft, Summer Fun, Week One

My younger son graduated kindergarten, we actually call it the end of year celebration ceremony (we believe you don't "graduate" until high school and then college. We want to hold school standards in a high regard, and if the kids keep having these "graduation ceremonies" then they will start to lose their value. (Their 8th grade graduations will be recognized with a small family dinner at a restaurant of their choice.)

Younger sons first day of summer starts this Monday, or my older son still has one additional week of school. I asked my younger son what he wants to do on his first day of summer, he said let's go to culvers for ice cream. I said are you sure there isn't more you want to do, we have a whole day of fun we can have, so he said let's go to the zoo. And so we did, on Monday we hit the zoo first thing in the morning with our popcorn made it home. We saw the animals that he wanted to see and that he picked. Baby girl did not mind at all her brother making all the decisions that day. Then we drove straight to culvers and thankfully since it's about 30 minutes from the zoo both the kids took a nap in the car on the way there.

> > It was an all fun day! > >

Tuesday we were bums, and got started on Father's Day gifts (which is coming up this Sunday) and I finished my sanding and painting my frames (for my Chicago Water Colors I wanted to hand in the powder room). Its gonna be a rainy week to boot. I had looked up some ideas on Pinterest and questions to ask the kid regarding their dad. And I knew I would make the handmade card for him.


Fathers Day gifts, Handmade
A picture of my dad, I drew Daddy behind a Rainbow.


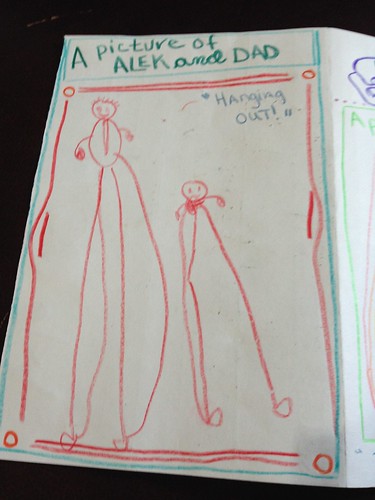
Fathers Day gifts, Handmade
"Hanging Out" with Older Son.


Fathers Day gifts, Handmade
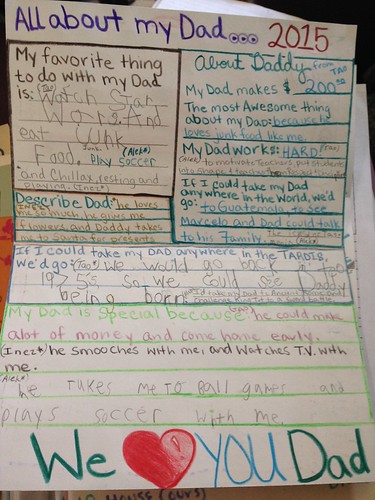
All About my Dad, these were fun to ask and write. 

All About my Dad Questions: (Thanks Pinterest)

I loved some of the 1 or 2 question cards for dad - So of course Type A mom decides to make a chart. Specifically with open ended questions so the kids could give me loads of details. 


  • My Favorite thing to do with my dad is:
  • Describe Dad:
  • If I could take my dad anywhere in the Tardis, we'd go: (yes we were going thru a phase)
  • My Dad is special because:
  • About my Dad:
  • My Dad Makes: $____
  • The most awesome thing  about my dad:
  • My dad works:
  • If I could take my dad anywhere in the world we'd go:


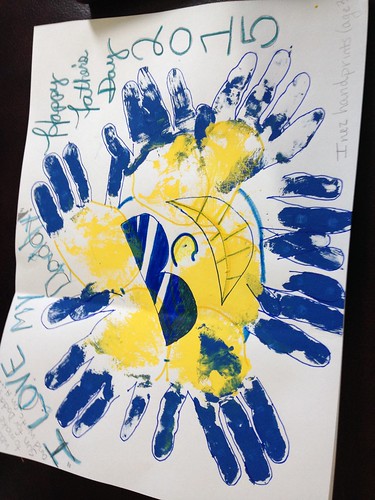
That night of making Father's Day cards, baby girl told her dad she's going to make him a card with the sun on it. Well that was not on our list, so of course we added that to the list and made her card the next day.


Fathers Day gifts, Handmade
Baby girl wanted to make dad a card with the Sun on It! 


WE LOVE YOU DAD

 Make Mistakes, breathe, reflect and Laugh.Out.Loud.

Friday, September 5, 2014

Handmade Card for Baby Shower

Some PINspiration started my idea for a "baby's starter library" for a baby shower gift. Yes my inexpensive finds of some basic baby books were the foundation of the gift.

So few gifts include a handmade card or element. And I don't think it's lack of talent, simply a lack of time.

My two PINSpiration photos (top and bottom left side) are included. I liked the idea of the word BABY in a fancy script and a garden theme for the "starter library." My first sketch is included - I guess mated spacing and my colors and flower shapes. Here is experimented with color pencils in sons school supplies.

Handmade Card for Baby Shower by areyousureaboutthatblog
Handmade Card for Baby Shower, a photo by areyousureaboutthatblog on Flickr.

Total time commitment was about two hours. 30 minutes to find the PINspiration, 30 minutes for my sketch and the final piece took one hour to sketch and assemble with the toile cover glue on and then tied to the books with a pretty ribbon.

The books were added to our pack which included the splurge gift, a pack if diapers.

Happy photo finding. Photo 4 of 5 Final Sketch for cover of the books when wrapped.

UPDATE March 2015

I'll be making 2 more of these gifts for babies we are Welcoming into the World.
My only change to this project is making this "Babies First Library" instead of starter.

Saturday, March 8, 2014

PINspiration Project DIY Fail: That Cute Dinosair Plastic toy Toothbrush Holder

I love Pinterest. And with 25 millions pins, who wouldn't. Filling my day with kids activities and organizing activities becomes so easy when you have so many ideas. And then there's those ideas that LOOK great... But don't turn out that way. 

Pinterest had a cool post about repurposing kids toys into storage solutions. A plastic dinosaur becomes a toothbrush holder.... Loved it. So after I finished installing my DIY ladder for younger sons Junior Bunk Bed - I used the tools to drill some holes.

The drilling was slow and awkward in the plastic dinosaur. Then I kept having to make the holes bigger because we have those "easy to hold" bulky kids toothbrushes. So I used scissors to cut a large area out. Pinterest FAIL. The cutout is sloppy, and there is t a nice way to finish the cut plastic edges. Four bulky kids toothbrushes won't fit in this Dino. And I'm not making space in the bathroom for 2 Dino's.

Kids need to see us fail. So they can learn with us that things don't always work out. How to deal with said failure and talk thru what we learned.

It was nice to experiment. 


Make Mistakes. Breath, Reflect. And Laugh.Out.Loud

Wednesday, February 5, 2014

Easy Kid Project: Bird Feeder

We are enjoying spending time with our cousin for a few days who is a new big sister to twins! While playing in the toy room (soon to be retitled play room) she noticed our soda bottle bird feeder outside hanging in the lilac tree. We planted this tree when we moved in, as a transplant from our first home. Its here so the kids can enjoy watching their bird friends come to visit, and eat.

Its a very snowy day in the big city - we had a new 4 inches of snow fall over 48 hours when this storm passed. In the top right you can see the finished bird feeder circles - made from Pipe cleaners and circle cereal (we used a generic whole oats brand). It was COVERED in snow the next morning. However its been several days since, and the city has warmed up - and our bird friends gobbled these treats up!
Easy Kid Project: Bird Feeder by areyousureaboutthatblog
Easy Kid Project: Bird Feeder, a photo by areyousureaboutthatblog on Flickr.


We used pipe cleaners and cereal circles to make bird feeders. Our cousin inspire everyone by making patterns. She chose brown, color, brown, color.
Easy Kid Project: Bird Feeder by areyousureaboutthatblog
Easy Kid Project: Bird Feeder, a photo by areyousureaboutthatblog on Flickr.

I had to hold baby girls pipe cleaner, but she practiced her fine motor skills as she looped the cereal on.

The girls put the feeders on as bracelets instead of "just" carrying them to the play room. We hung our feeders on the lilac tree near our window so we can easily see the birds enjoy their treats when we sit and play.

We will be sure to shake the snow off for the birds easier access as the storm passes.

Make Mistakes. Breathe. Reflect. And Laugh.Out.Loud!

Friday, November 15, 2013

Homemade White Clay: Why we need to Fail with our kids

Don't you love finding those great homemade crafts on Pinterest. My Pinspiration "White Clay" activity caught my eye because of the gorgeous bright white color of the dough. And the cute cookie cutter ornaments made with the dough, and the ability to paint the baked ornaments.... Yada Yada Yada!!! All looks nice on the PIN.

Venting time: can't do any if this fun "white clay ornaments" and painting them afterwards if the dough flakes and when you finally do get an ornament made it disintegrates coming out of the oven. Vent complete.

We totally enjoyed the mixing, measuring, stirring and talking about our science, err um, I mean fun craft. I squeeze I learning everywhere we can!!! We ate lunch as the dough cooled for about 10 minutes or so.

Project Fail, White Clay Dough
Recipie we followed:

Bright White Clay Dough

Ingredients:
2 cups of baking soda
1 cup of cornstarch
1 cup of water

Directions:
1. Combine baking soda, cornstarch and water in a medium pot and stir over medium heat until all ingredients are dissolved.
2. Continue to stir over medium low heat until mixture thickens.
3. Once thick, immediately remove from heat and transfer mixture into a mixing bowl. Be careful, mixture will be hot!
4. Cover with a cold damp dish cloth until cool enough to knead.
5. Knead dough until soft and smooth. If mixture is too dry, add a few drops of water at a time and knead until a softer, workable consistency is reached.
6. Roll out dough to 1/4" and cut into shapes as desired.
7. Bake finished creations on a parchment paper covered cookie sheet in a warm oven (I do mine at 175 degrees F for about two hours, flipping them over about half way through baking.) Allow to cool completely in the oven.
8. Once completely dry, finished creations can be painted with acrylic craft paints and sealed with a craft sealant.
9. Wrap unused dough in plastic wrap to keep it fresh.

We did make the dough by heating ingredients in the pot. My first tip that is failed was the smooth texture of our version. It should have been "stickies" and looked more lumpy. And just as every good scientist knows, you will learn during the process, and learn from your failures.

Here's younger son enjoying the warm dough.

Here my younger son is enjoying how warm it is to his hands. He's been under the weather so mommy's homemade chicken soups in the pic too.

My next indicator of failure was the lack if bonding in the clay / sticking to the table and not as pliable as it should be.

Younger son loved playing with his "mountain." He wasn't into ornaments and cookie cutter shapes. He instead had the "cat" eat the "fish" but applying one cutter image over the other. And I can't say enough about the gross and fine motor skills needed to push, press, pinch, and shape the dough.

He was not frustrated - as was the adult in the room (me) - with the dough flakes, pieces and chunks that were falling off said mountain.

Baby girl enjoyed watching us, and touching the warm dough. Otherwise he was more into the cookie cutter shapes, and less into playing with the dough.

I rolled out the dough, into thicker and thicker segments. The cookie cutter shapes would break apart. Then the dough would stick to the table. Just frustrating. Add the flaking dough and it was not fun (for mom).

However baby girl loved flaking pieces all over the floor. And throwing cookie cutters on top.

Afterwards I took my dozen ornaments in animal shapes into the oven for 60 minutes at 175.

Here's our table after the experiment. Younger son is putting flakey dough remnants into a Baggie (so older son can enjoy after school).

And like our favorite clean up time song says: "you can clean where it's small and I can clean where it's tall." For the first time my 4 year old used the vacuum cleaner and picked up the flakey pieces. Baby girl and I wiped up the table each with our own sponges.

Cleaning may have taken longer then the entire project - cooking and molding together.

As for the baking, everything went smoothly. Then I removed the ornaments, and as the tray cooled I nudged one, and the leg came off. I nudged the duck beak and it flaked apart. All the pieces disintegrated. All of them. And the little rolled "balls" of dough we thought we'd make marbles from, they cracked, and dented. So interesting flops all the was around.

But even with the failures, we had fun. And we lived a real experiment. We need to fail with our kids too. Talking about our projects. What we were making. How it felt. It was "fun mommy." And then as you know real life doesn't work 100% of the time. So my kids also need to experience failures so they know how to handle disappointment. And they can learn to persevere, and try again, and again until we reach success. And you can't beat that.

The flop
We think we didn't add enough baking soda. My younger son remembers adding 1 cup of everything instead of a single 2-cup ingredient.

We will revisit this project. And try a smaller batch recipie. It's a low cost flop, but a high impact failure experiment... Again positive for my kids experiences.

Make Mistakes (like I did). Breathe. Reflect. And Laugh.Out.Loud. It helps with coping skills and failures.

Tuesday, November 5, 2013

East Kids Nature Project: Leaf Rubbing

Incorporating nature into our lives and our art is a regular activity. And so easy. Just walk outside your door for that "in-season" inspiration you may need. And some much needed exercise / energy release and running around for the kids.

On a recent walk around the block. we collected leaves of various shapes and colors. Then we proceeded to lay them out in my Older Sons particular order....we secured paper by taping it down on all sides of our cardboard, and rub impression onto paper with color crayons and viola!

This was a fairly easy project to put together. It hung in our front window after we admired it an talked about the interesting "veins" and patterns the leaves made.

Here he is just starting out the rubbing. It was a quick project to get thru, once he picked his colors he was done in 15 minutes or so.

Areyousureaboutthatblog Older Son Picking his Color Scheme

Areyousureaboutthatblog Color Scheme and Variations on the Leaf Details


Areyousureaboutthatblog Close Up of the Leaf Veins and Detail
Nature Project: Leaf Rubbing

Level of Difficulty: EASY

Time: Collecting leaves, may vary. Not including getting coats and shoes on a few minutes. More selective kids may explore the leaves longer, being VERY specific about shapes and colors. That's part of the fun, so don't rush the to pick out there leaves and quickly get to coloring. The outdoor exploring is just as vital!


What You Need:
  • Bring Enthusiasm!!
  • Leaves, easily collected on a walk through your neighborhood, or around the block.
  • Paper, white works well
  • Hard surface. Place leaves on the floor and then tape paper over it - watch out for coloring over the edges. If the floor is hard wood, or tiled, the "edges" or flooring detail may poke thru the rubbing effect / might be pretty cool!!
  • Crayons, preferably with paper removed slightly or completely. When rubbing or "coloring" just using the crayon tips, less of the leaf detail comes through.

Questions to ask during the project:

When Outside Collecting Leaves - explain the project "We are going to collect some leaves. We want big ones, and little ones, and as many colors as we can find. Then we are going to do a neat magic trick and copy the leaves onto paper using our crayons. It will be amazing!"

Just conversation starters.... don't grill you child with these questions, engage them in conversation!

What color leaves did you find?
Is this a red leaf?
I wonder why the leaves are changing their colors from green to...yellow, red, etc.?
Is that leaf bigger then your foot?
Gee, good thing the leaves are on the ground, so we don't have to climb a tree to get them...why ARE Those leaves on the ground?

At Home:

Layout the project, encourage your child to pick which leaves and allow them to layout out as many or as few as they'd like to prepare for the rubbing. Their is no "right way."

Then tell them it's the "adults part of the job to do" - taping the paper down.

What colors will you pick to rub over your leaves?
What do you think will see when you start to color?
What are those lines on the paper from?
Looks like magic, the leaves are coming thru the paper...
Which one is your favorite leaf rub?
Why do you like it?....(again there are no "right" answers)


Enjoy your quality time together. This quick project will leaf memories for months to come.

The Days are Long, the Years are Short.

Make Mistakes, Breath, Reflect and Laugh.Out.Loud.

Monday, August 19, 2013

Re-finish Frames for Fathers Day gift.

You will notice I'm writing this on August 19, and I'm not early for Fathers Day next year,  writing about the one that passed in June 2013.

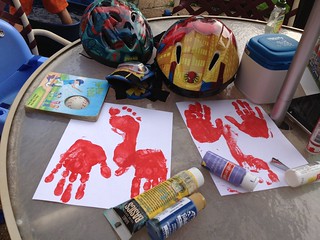
I have a board on Pinterest with hand, finger and foot print ideas.

These were the inspirations. 


Work in progress. First sanding the ugly gold color frames (okay not ugly, but they don't match our homes style).

My any 'ol box for laying frames in for spray painting so it doesn't go everywhere and all over.


Then I spray painted the frames, about 3 coats letting them dry 10 minutes in between each coat. Baby girl was getting antsy by the end so I gave her a small outdoor water tub and some plastic cups to occupy her for a little longer. 

Here's the finished product hung up at home. Dad loves them, mom too. Thank you Pinterest!

Thing 2 - is my young sons nickname. We even have Thing 1 thru 3 t-shirts from Wisconsin Dells this year. That one has a phrase from "Oh the places you'll go," relevant because my husband read this book to the teachers on the first day of school as a "modeling exercise." But relevant to him too.
 
My older sons hands and feet.
2013-06-11 Family Spring 2013 001 (2)
 
Baby girls feet say "the best things in life aren't things." 
 
Here is young son about to wash off the colors form his hands when we made the Thing One and Thing Two imprints.
2013-06-11 Family Spring 2013 004
 
And finally the aftermath and Inspiration that my young son and baby girl enjoyed after we washed the paint off. They decided to paint the sidewalk with the remaining ink on the paint brushes and also "paint" with the water.
2013-06-11 Family Spring 2013 008
Um, this is NOT recommended as we used acrylic paint (for permanence in the project and Kid Art.... it is STILL on my sidewalk a year later).


The days are long the years are short. So enjoy the moment NOW. Paint and All!

Make mistake, breathe, reflect and Laugh.Out.Loud.
 

Summer Bucket List 2013 (with Chicagoland Area Web Page Links)

After finding lots of great ideas on Pinterest, and creating a MUST DO board for the kids, we finally sat down and wrote our Summer Bucket List. We did a lot of impromptu stuff this summer too - like the Waukegan Library Book Sale a friend posted about on Facebook. Instead of paying .50 cents per kids book and $1 for adults, I got a Big Red Bag of books for $5.

We did put the effort into actually writing out a Summer Bucket List and I like Sharing. At the end of this post is an update with a list of what we actually did, things not on the list, and moms tasks in addition to the list. We didn't craft nearly as much as we usually do either, because we were outside nearly EVERYDAY!!

2013, oUR family summer bucket list

       GO PLACES

     BEACH!!                                                Go to the park (A LOT!!)
     Water Park (A LOT!!!)                         Go bowling
     Nature hunt (s)                                       Alphabet Scavenger hunt
     Shapes Scavenger Hunt                         Have a picnic
     See movie at a drive in                            Santa’s Village
     Go to A Farm (Glenview)                       Wild West Town
     Museum Days 

AT NIGHT
        Catch fire flies                                          Use the Telescope in the Yard
        Roast Marshmallows

COLLECT
     Collect Bottle Caps to make an end of summer Mosaic
     Bugs, Rocks, Feathers, and …

AT HOME OUTDOORS
     !! Make JAPAN Paper Ring Chain Countdown !!
     Grill dinner once a week                      Make recycled water pouring wall (pinterest)
     Make Giant Ice Cube filled with plastic toys to CHIP APART
     Roast Marshmallows                            Blow bubbles (Bubble Station)
     Eat ice cream and popcorn for dinner
     Outdoor Alphabet hunt                       Exploding Paint – make ART BOMBS
     Make Bird Bath Mosaic                       Block Party

RAINY DAYS
     Make Stained Glass: Draw Sharpie on wax paper looks like stained glass
     Build a fort                                            Balloon Ninjas to shoot with Nerf Guns
     Make Hands/Foot Paint Animals    
     Make Hotwheels race track with drawn race course and tube
     Make Jet packs from Soda Bottles  
     Make GEO BOARD (Pegboard w rubber bands)
     Bake Cookies!!!                                     Make Fingerprint Ornmnt
     Move Chalk board to kitchen (Keep family menus on)
     Paint pebbles/rocks with glow in the dark paint to line the garden/walkway
     Make MOONSAND                           Indoor ALPHABET HUNT
     Make VOLCANO ERUPTIONS  
     Make the Outdoor TIC TAC TOE from rocks and wood
     IVORY SNOW Cloud                        Wii, & iPad 

*** UPDATE *** UPDATE *** UPDATE *** UPDATE *** UPDATE *** 

BEACH

We went to the beach a lot. While my mom had the kids during our trip to Japan. They were at the beach nearly every day, sometimes 2x a day. 


ü  Loyola Beach

ü  Indiana Dunes
ü  Boogie Boards at Waukegan Beach
ü  Loyola Beach with our Cousins


GO PLACES

ü  Go to Parks –  a different park each Wednesday with our Cousins (splash pads, climbing gyms), our neighborhood park and surrounding parks, bicycling to the school park, and with Uncle Bogie.
ü  Water Park – only 1x because it was such a cool summer. But we did slip and slide with our neighborhood friends and in the yard. We also had a splash water fight with Dja Dja in his yard.
ü  Nature Hunt – when we were at the Nature Center with our Cousins we did this nature hunt. Totally Fun!  While at the Spring Valley Schaumburg Nature Center (so awesome, includes a ½ hour walk to a mini farm) our cousins granola bar was stolen by a Chicken there.
ü  Have a picnic – everywhere we go for a DAY outing I pack our (found in the alley) California Wheel Cooler with food and we picnic.
ü  Kohl’s Children’s Museum – purchased at 50% off with Travelzoo.com, great deal. Paid $19.50 for two instead of per person.
ü  Roast Marshmallows – with our Tia
ü  Brookfield Zoo and Lincoln Park Zoo (and picnic’s)
ü  2 weeks with Baba – went to Fair Oaks Dairy Farm, saw pigs and cows galore
ü  Glenview Wagner Farm – love this place.

COLLECT

ü  Bugs. We collect dead bugs and pin them. I collected Bugs in Japan and at home.
ü  Rocks at the beach and everywhere else.

AT HOME / OUTDOORS

ü  Make Japan Paper Ring Countdown Chain – read about it.
ü  Make GIANT ICE CUBE PICKER – filled with toys and rocks for the kids to destroy. From Pinterest
ü  Bubble Station – from Pinterest
ü  Build a fort – on rainy days.
ü  Make Hand and Foot Print animals – for fathers day – here’s the result.

ü  Played Wii – only 2x
We did one 2 crafts this summer, the Japan Countdown chain and Telescopes from Toilet Paper Tubes.

Not on the List


ü  On the FIRST DAY OF SUMMER we went to our local library. And to my pleasant surprise they had started the book club THAT DAY. So we joined up….Library Book Club – we joined our library’s book club. We read EVERYDAY this summer, alone, to eachother, and at night time! I AM PROUDEST OF READING EVERYDAY THIS SUMMER!!!
ü  Lake County Fair with Dad
ü  Bike Riding with mom and dad in the Forest, using the bike attachment for Baby boy and Girl to ride in.
ü  My older son chose “an experience” for his birthday instead of a party. We had dinner at “a fancy” restaurant and cake at home at my mom’s in Indiana. Older Sons birthday gift hunt and Trampoline Hunt/Map – see more here
ü  Got Geodes to crack open from our Uncle’s Trip to Colorado with his Cross Country Track Team
ü  Movie and Cookies and Ice Cream with Ciocia Jola, just because
ü  Pirates Cove Amusement Park (and we picnic’d) $11 per child and baby girl was free (they thought she was under 1).

ü  Wicker Park fest, where we grew radish and pinto beans using hydroponic gardening - we used a clear glove instead of the jar. Later these were planted at Baba's house. (This summer, families can watch plants grow without soil in a hydroponic garden)

We also made red current jam from our garden berries (and with frozen mixed berries). We gardened, planted carrots, tomatoes, pumpkins and a few flowers...

Mom actually planned the 4th Annual Block Party this year, booking the jump house, obtaining the permit, and buying kids crafts to paint, bead, and tattoo ourselves to no end.

I also was able to spray paint some ugly gold frames we had to display dads Fathers Day present of the kids hand and foot print animals (Pinterest Inspired). So glad that's done.


So it looks like I am keeping this list for next year. We actually completed about half of the list.....which means we can look forward to have a lot more fun in our future.

The Days are long, but the years are short....Make Mistakes, Breath and Laugh.Out.Loud
Related Posts Plugin for WordPress, Blogger...

Search This Blog

PIN it