Tips for Pinning Bugs Beyond the Basics and Helpful Tips even vacation
AS I wrote my draft I realized there's a series of tips to consider when pinning. I hope this is helpful to anyone who has been pinning for years, and for beginners.
Here are a few tips I have collected on pinning bugs. Happy Pinning!
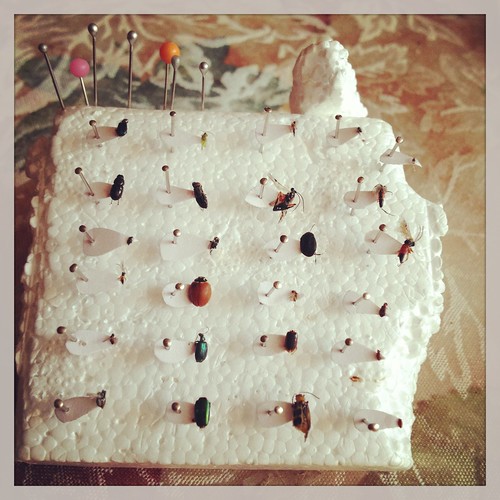
These bugs were collected at Loyola Beach in Chicago. I picked up what I thought were 7 bugs, they turned out to be 28 of them! Attached together in sandy bits.
-- Bug Collecting Tools of the Trade
Bug collectin is a low cost hobby. It isn't always sexy - as the tools are basic. Here is a photo of what we need in our bug collecting pinning and staging needs. My collection jars (which are just regular jars / plastic boxes), hydration jar, and kill / injured jar are not included here.
- On vacation! On a recent trip to Jamaica we colledcted a few bugs for our collection. You do need an agricultural customs declaration and approval form completed inorder to legally bring insects into the states. However if you are traveling within our borders, collecting insects in other states offers a nice variety as well. Even traveling a few miles can sometimes make a difference!
- Tweezers: when using tweezers be gentle. I use them or a pin to pull a leg an check for how pliable it is. Sometimes I use tweezers as a stabilizer on the left an right side so they move less when pinning.
- Staging Bugs: You do not have to stage the bugs legs and head, thats obviously a personal chouce. Its recommended because it would be very challenging to "go back" and have to stage the bug later (after having to hydrate them again). Also theres a chance that the older the speciment the great chance of breakage, so if you are going to stage, do it right away when you are pinning.
Here are a few tips I have collected on pinning bugs. Happy Pinning!
These bugs were collected at Loyola Beach in Chicago. I picked up what I thought were 7 bugs, they turned out to be 28 of them! Attached together in sandy bits.
LIFE IS STILL EXCITING AT OUR HOUSE!
With more insects. . .
AMI Studios Chicago
It's mostly baby girls videos and here slime making, she spends time with friends, goes on road trips, lots of coloring activities and make good choices while having fun. During the covid stay at home orders - she had many many many facetime pandemic playdates - we made time work for us and not be bored.
Tips for Pinning and Staging Bugs
- Don't Allow Insect to Touch Styrofoam. Keep in mind, especially if your not using a pinning block, that the legs and antennae shouldn't touch the styrofoam when staging the bug. Later when moving your bug to its final collection box, legs can break when the pinned bug gets moved and reinserted into the final styrofoam, and as when my older son took his box to second grade, the kids shook the box, and bugs "touching" the surface lost limbs. You don't Ben want the legs touching the label. Again there's a chance of breakage.
- The Criss-Cross Pin Method. Use the "criss-cross pin method" (see this method used on our house centopede pin here, under step 6. Staging) to help level and secure your bug in place while pinning. Otherwise movement tends to lead to frustration. I'm not in a lab dealing with extraordinary volumes of insects, so I can be particular.
Tips for Pinning Bugs Beyond the Basics and Helpful Tips even vacation
- Get Inspired: look at insects pinned at your local museum or online, even collections on Pinterest. We have 4 bug boxes, so just to keep things interesting I'm going to start different staging. Especially with cicadas. Some pinned upside down, sideways, cicadas trapped while molting their nymph skin, nymph skins, wings pinned out, just the left wing and just the right wing. This allows you I observe your own collection in a new way.
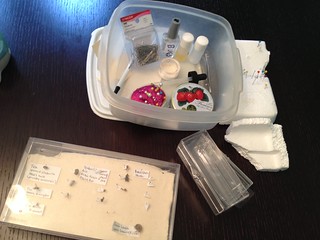
-- Bug Collecting Tools of the Trade
Bug collectin is a low cost hobby. It isn't always sexy - as the tools are basic. Here is a photo of what we need in our bug collecting pinning and staging needs. My collection jars (which are just regular jars / plastic boxes), hydration jar, and kill / injured jar are not included here.
This is our original storage method for our bug supplies. I have evolved somewhat from this system. Here you can see my straight pins, where now we use true pins designed specifically for insects. However small viles of pine sol and water are always around for my hydration jar. The purple push pad was for staging pins. Clear nail polish for repairs. A small bowl and lid / container, for the hydration jar, pen for notes, a suction syringe and pieces of syrofoam. I still use a "starter" box for the final collection to determine later spacing needs.
- On vacation! On a recent trip to Jamaica we colledcted a few bugs for our collection. You do need an agricultural customs declaration and approval form completed inorder to legally bring insects into the states. However if you are traveling within our borders, collecting insects in other states offers a nice variety as well. Even traveling a few miles can sometimes make a difference!
- Tweezers: when using tweezers be gentle. I use them or a pin to pull a leg an check for how pliable it is. Sometimes I use tweezers as a stabilizer on the left an right side so they move less when pinning.
- Infestation Prevention: I've read that if your collection gets infested, you can put the bug I the freezer to kill the eggs / larvae. Also preventative measures are key: use air tight containers at all phases of your process (collecting, kill jars, staging, and final storage). Also using shreds of moth balls in the case help prevent infestations. However read all cautions, breathing in moth balls cause neurological disorders, be cautious when using these chemicals. If you can smell moth balls in your collection, be cautious on not storing it, say, in your kids room.
These are our collection of Tips for Pinning Bugs Beyond the Basics and Helpful Tips even vacation
- Staging Bugs: You do not have to stage the bugs legs and head, thats obviously a personal chouce. Its recommended because it would be very challenging to "go back" and have to stage the bug later (after having to hydrate them again). Also theres a chance that the older the speciment the great chance of breakage, so if you are going to stage, do it right away when you are pinning.
- Kid Pinning, Start with Cicadas. if your pinning with kids cicadas are a great start. Collect several cicadas, so when you pin them, kids can crush or ruin one and quickly leave about being delicate with their specimens. Because no amount if parents explains is the same as experiencing pining for yourself! Then after they quickly learn the lesson of pinning slowly, and gently, you'll have another cicada specimen (or 3, 4, or 10) for them to keep working on. Let them do everything OPPOSITE of what I've noted. Pushing pins in too far, to short, don't stage them, stage only some, letting legs touch the styrofoam, and making lots of "mistakes." I Can. Not. Wait. To do a cicada bug box with my kids this summer!!!
- Damaged or Broken Parts: Many times I have lost a leg (and evne a beetles head detached form it's body) while pinning. Clear nail polish can be used to reattach the leg. Hold the leg with the tweezers, and position the leg on the tweezers how it will look when you reattach it (grab the leg in the position you will want it eventually to be in). You don't want to be moving the parts your reattaching and fiddling with them once the glue or polish is on for attaching. Using the nail polish brush, brush of the liquid from the on the nail bottle (again you'll perfect how much to use over time). Brush onto the part (not the body or you'll get too much polish on the segment) and attached to the body. HOLD the part in place several seconds and gently blow on it to speed up drying process. I have also used pins in the cross-cross method to help keep the leg in place while drying.
Make Mistakes. Breahte, Reflect and Laugh.Out.Loud.


No comments:
Post a Comment